These hanging thingies are so quick to make
you can make a couple in no time and have
them ready as Christmas gifts .
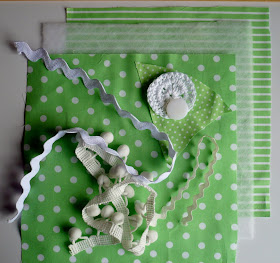
Supplies needed -
8" square of 2 fabrics .
8"square of thin wadding
8" fat ric rac ,8" pom pom trim
matching ribbon or ric rac for hanging
Stitch the fat ric rac about 1/2" from edge on outer fabric
on two sides only .
Place your thin wadding down , lay the outer fabric
on top with the right side up .
Secure the pom pom trim along the outer fabric
on the same edges as the ric rac .
Lay the inner fabric on top with the right side
facing down .
Stitch through all layers using a 1/4 " seam allowance
and leaving a gap for turning .
Turn through gap and check that all
layers have been stitched and pom pom trim is secure .
Turn inside out and trim corners .
Turn right side out again and press .
Fold in half with the ric rac on the inside
to form a triangle .
Stitch from bottom point to top , clip bottom point .
Pretty up the front (and disguise where the ric rac may
not quite meet ) with a crochet circle and covered button .
Stitch some ric rac to the high point at the back for hanging .
I also added a white paper doily .
My hanging thingies were filled with mint
flavoured chocolates wrapped in cellophane
and tied with fabric scraps .
I'd love to see what fabrics you make yours in ,
please let me know so I can come and have a look .


OOhhh I love your hanging thingys and you speaka my kind of language! Great tutorial..you know I might just time to make these...before Easter..they would be great then too.
ReplyDeleteThanks for sharing,
Kiss Noises Linda
Oh my goodness....that is just adorable...thanks for the tutorial!!
ReplyDeleteI reckon I might just make a few of these hanging thingys :)
ReplyDeleteWow! I really love these and will give them a real go in the New Year!
ReplyDeleteI really liked these when you showed them before, so glad you have put up the tute. Would love to make some for the table decorations, time permitting
ReplyDeleteThanks for sharing! Not sure that I'll get any made for this Christmas but I should be organised for next year!!
ReplyDeleteYou're so sweet to share this Clare.
ReplyDeleteBookmarked for next year. Im not going to kid myself that I have time to do them before the big day this year. These would also be perfect for Easter or anytime really.
these look great Clare, love the name..so techi..lol..
ReplyDeleteLol, I thought these were called Cornucopias, but not having made any before I could be wrong?! What ever you call them they're cute and thanks so much for the tute :D.
ReplyDeleteThanks for the tutorial - yours really are special in that green spot.
ReplyDeleteI'll probably get distracted soon and have a play - try to make one or more of these.
Hi Clare, thanks for visiting and leaving such a nice comment. Your hanging thingies are adorable. LOL...'thingy' is the same technical term I use all the time. Drives my hubby crazy. Love your granny pillow also. Much talent to behold in your space, I will enjoy perusing. xx Josie
ReplyDelete*squeal* Oh Clare thanks for the tutorial - these are soooooo pretty!
ReplyDeleteI am loving this, might have to find an hour or so to have ago... Thank you for sharing...
ReplyDeleteHi Clare, Your hanging thingies are gorgeous!!! I go on holidays soon and I'm going to have to make some now. Thanks for the tutorial. Kind regards, Anita.
ReplyDeleteI think they'd be great at anytime of year Clare and I like Lilly Linda's idea of using them for Easter too. Great tutorial.
ReplyDeleteHugs ~ Kerryanne
Thanks for sharing your tutorial Clare. Hopefully i will find time to make some of the hanging thingies.
ReplyDeleteSee, I'd be the sort of person to do a Google search for 'Hanging Thingies'. I'd love to know how others Google their way to this post!
ReplyDeleteWe made these hangy thingy in a swap a few years ago (we called them cornucopias), I loved making mine andmight even make a few more one day for gifts.
ReplyDeleteGail
Thanks for leaving the comment. fun blog! Im following you now :)
ReplyDeleteVery cute Clare .. nice for a stocking stuffer too.
ReplyDeleteThanks for explaining it so well, I really liked those hanging thingies infact the color looks so soothing,nice creativity, will definitely try this...
ReplyDeleteI think you can definitely make a number of them in just a moment but I think it would be petty tough for us to be so quick. The color of those hanging items are very attractive. I love them.
ReplyDeletethese are absolutely gorgous i will make some of these for xmas this year,thankyou
ReplyDelete