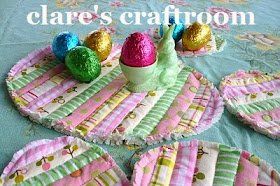
I've been promising a new tutorial for a while
and finally here it is !
It's quick , it's easy and you can change the colours
and make it for kids or big people .
They would look great on your Easter breakfast table !
You will need about 20 x 1" x 60cm strips
in fabric of your choice .
wadding and backing fabric approx 65cm x 40cm .
Make sure your wadding and backing is
a bit larger than your front piece.
Join your 1' strips to make a piece about 40cm .
Lay your backing fabric right side down .
Sandwich the wadding between the joined piece and
the backing fabric . Secure.
Stitch in ditch along all joins .
Use a fabric marker and trace 4 egg shapes about
the size of your hand on the back of the quilted piece.
Repeat for a larger egg shape for placemat about A4 size .
Do not cut shapes out yet.
Stitch all around shapes .
Cut out all egg shapes about 1cm from stitched line .
Use clippers or small sharp scissors to snip little cuts
all around from the edge
to the stitched line taking care not to go too far .
Give your coasters and placemat a good shake to shaggy up the edges .
I hope these instructions are clear enough for you .
I.am.not.a.quilter.
Please let me know if you make some as
I'd love to see them in your choice of colours .


Simple, easy and incredibly cute. Thanks so much for the tutorial.
ReplyDeleteSo very cute!
ReplyDeleteVery cute Clare, thank you for that!
ReplyDeleteI.am.a.quilter. and you did a great job. They're cute!
ReplyDeleteThey're lovely. Easter has been on my mind and I'm seriously considering trying out this tutorial. Besides, it will give me an excuse to go to the quilt shop! I'm also going to make a first attempt at hot cross buns.
ReplyDeleteThese are very very cute and your instructions are very cloear and simple. I wonder if it would work using the quilt as you go technique.
ReplyDeletehugs & blessings
Gail XXX
PS you may not be able to say you are not a quilter for much longer :-D
i'm hoping to be able to do a bit of easter crafting this year, this is a neat idea, thanks for the tutorial :)
ReplyDeleteso cute........ and the colours a lovely
ReplyDeleteI'm not a quilter either Clare but I think I could give these a go. Very cute :)
ReplyDeleteVery cute and crafty.
ReplyDeleteThanks Clare for sharing..
Hugs Michelle
Very cute and crafty.
ReplyDeleteThanks Clare for sharing..
Hugs Michelle
They are wonderful!!! Thankyou Clare!!!
ReplyDeleteThese are adorable...thanks for the tutorial!
ReplyDeleteThanks for this lovely lessons!
ReplyDeleteLovely!
ReplyDeleteThese are great!!!!
ReplyDeletePerfect!
ReplyDeleteHow CUTE - thanks for the great tutorial, Clare! Oh and btw - yes, you are a quilter now, lol!!! These qualify as mini-quilts!
ReplyDeleteThanks for a great tutorial Clare.
ReplyDeleteHugs ~ Kerryanne
Such pretty material - it's a lovely tutorial. Thanks for sharing it Clare.
ReplyDeleteThanks for sharing Clare. what a great idea.
ReplyDeleteVery pretty and cute with clear and easy to follow instructions.
ReplyDeleteOh! These are Too Cute! I want to make some!! I will let you know if I do:)
ReplyDeleteQuick? Easy? Colour interchangeable? You got me, kid. (even though you're freaking me out slightly because I didn't quite realise that Easter was quite so 'looming')...
ReplyDeleteOh gosh! How cute are those coasters and what a great idea snipping the edge rather than binding.
ReplyDeleteJust noticed my blog in your blog roll links to my old blog. :0)
Oh Clare - that's just WAY too cute! I'm going to have to make some of these! :-)
ReplyDeleteThank you for the inspiration and the tutorial, sweetie!
Hugs!!!! Vikki xoxoxo
I just saw another pattern that I liked, but I wanted more oval shaped placemats, and you have them! I love the shabby edges too!
ReplyDeleteOh my goodness! These are so cute. You are so generous to share your pattern. I can't wait to make some of these for my granddaughters!
ReplyDeleteI would like to thank you for the rerun of your carrot tutorial I have a blogging friend who collects carrots. She is a real sweetheart, but had not been feeling well. I decided to send her a bouquet of carrots as a get well present. She loved them. I was in such a hurry to send them to her that I forgot to snap a picture. I'll get her to take one and I'll send it to you. THANKS again . mary k
belicismo!!!!!!!!!!!!
ReplyDeleteJust adorable, can't wait to make some. Thanks for such a great tutorial.
ReplyDeleteWhat a great tutorial. Very festive. Thanks. Lyn
ReplyDeleteAdorable! Thank you for the great tutorial!
ReplyDeleteThese look lovely, easy and something I want to do at the last minute. I am wandering what they would look like with binding, or if it would change the look too much? Any comments?
ReplyDelete